You can combine any of the commands you typed into the command line at last week's workshop into a script. This saves you time if you need to do the same again and again. Scripts are very useful if you need to control more complex situations. You can loop commands so they run forever, or until something else stops them; scripts are the driving force behind all that automation; let's automate everything!
A very simple example: Let's say we need a script that prints a bit of text and the current date. Let's start by creating a new text file called hello.sh
nano hello.shEnter these three lines of code.
echo "hello world!!!!!"echo "I said hi to the world at " dateExit the nano editor with "STRG-X" ("CTRL/CMD-X" on English-language keyboards) and confirm you want to save your changes with "Y". It'll ask again if you want to keep the filename hello.sh; confirm with the Return key.
Now you have an almost perfect little script. Run it with
bash hello.sh
You've just run your first script!
Working as expected? Use the Arrow-Up key to see the command you last used, and run it again with Return. If it's not working, open the script with nano again:
nano hello.sh
You'll see that anything you entered is still there. In full your script should look like this. Anything after a # (the hash character) is not interpreted as a command. Use it to annotate your code.
#!/bin/bash

echo "hello world"
# the echo command just prints text. Keep it in brackets if more than one word

echo "I said hi to the world at"

date
# the date command prints the current date and time
You can download it here. The first line tells the system what kind of script this is. In this case it's a script to be interpreted by bash.
Also try and script other commands, like ls or mkdir or touch. It starts to become fun with variables and loops. If you look up the syntax it becomes very easy to automatically do all kinds of things that would otherwise be a lot of work.
Check out the video-tutorials on Lynda.com, i.e. this one. You have free access if you sign up with your KHM email. And of course, Google's your friend to find a good free tutorial for beginners. Here is one with great design and as much background info as one could wish for.
You'll need a breadboard, two female-to-male cables, a resistor and an LED. Connect them as pictured here.
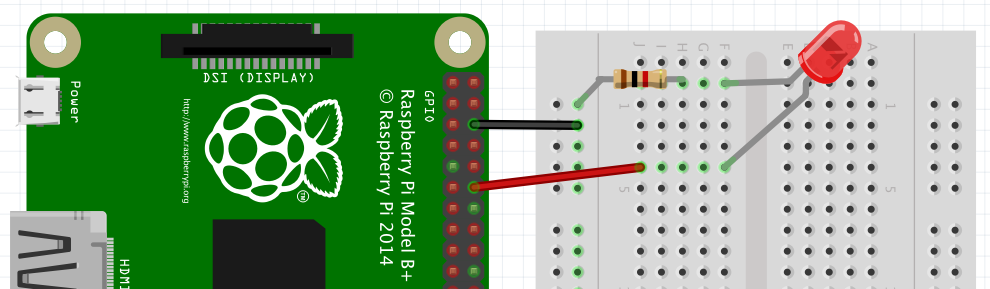
Note that the short leg needs to be connected to Ground (GND - the third pin from the top) via the resistor.
Create a new empty script, and call it led.py
nano led.py
Here's the full script:
import RPi.GPIO as gpio
import time

gpio.setmode(gpio.BCM)

gpio.setup(18, gpio.OUT)
gpio.output(18, gpio.HIGH)

time.sleep(2)
gpio.output(18, gpio.LOW)
time.sleep(2)
gpio.output(18, gpio.HIGH)
time.sleep(2)
gpio.output(18, gpio.LOW)
gpio.cleanup()
Exit nano, save changes and run the script with python led.py
With the first two lines we tell Python which libraries we're going to need.
import RPi.GPIO as gpio
import time
We tell it to use "RPi.GPIO" and, to keep things short, call it "gpio". The second line says we're going to do something time-based.
The third line is the first function. It tells Python how we're going to address the Raspberry's GPIO-pins. There are different ways, we're using the "BCM" way.
In line 4 we declare pin 18 to be an output pin. So our Raspberry is going to give power to it.
In line 5 we turn on the power to pin 18. So that it doesn't turn off right away, we tell it to stay like that for 2 seconds in line 6 (the number in brackets is the amount of time in seconds). In line 7 we turn it off again.
At the end we tell it to "clean up", i.e. tell the operating system that the GPIO pins are now free again to be used for other purposes.
Mess around with the script as much as possible.
We'll use the simple LED project from above and add some more things to the breadboard:
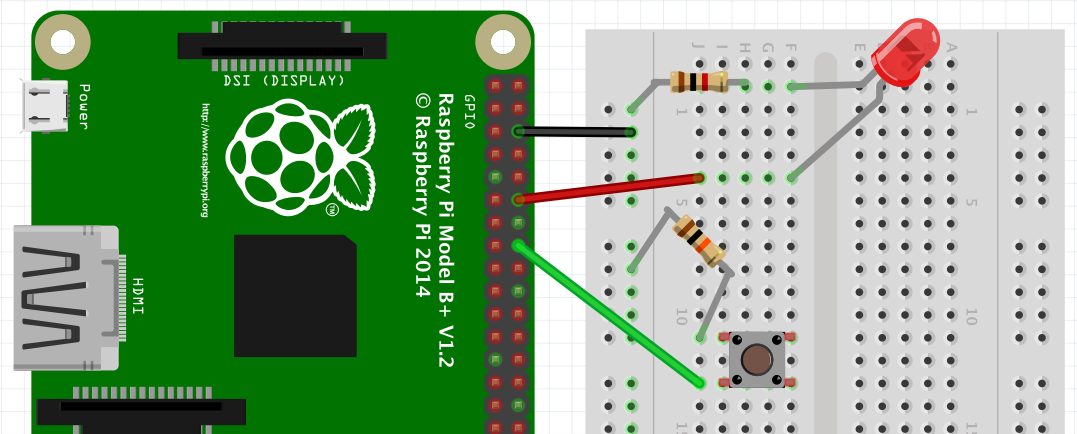
Make sure to connect everything just as in the drawing.
Create a new empty script, and call it button.py
nano button.py
Then type in this script (or copy and paste if you can):
import RPi.GPIO as gpio
import time

gpio.setmode(gpio.BCM)

gpio.setup(23,gpio.IN,pull_up_down=gpio.PUD_UP)
gpio.setup(18, gpio.OUT)

while True:
    buttonPressed = gpio.input(23)
    if buttonPressed == 1:
        gpio.output(18, gpio.LOW)
    if buttonPressed == 0:
        gpio.output(18, gpio.HIGH)
This introduces two new concepts: Because we now have a push button to reference in the code, we tell Python to change the state of pin 23, depending on whether the button is pushed down or now. This happens in line 6:
gpio.setup(23,gpio.IN,pull_up_down=gpio.PUD_UP
Further down we then introduce a while loop. We ask Python to check the state of pin 23, many times a second (this is how quickly such a loop runs). If it is pressed down, it sets the output of pin 18 to HIGH, in other words, it sends power through it which then lights the LED.
A loop like this will run forever, or until it is being stopped. As with any commands in the command line you can stop it with "STRG-C" (or "CTRL/CMD-C" on an English-language keyboard).
Can you figure this one out? Play a video at the push of a button - i.e. based on this script here
Instead of the button you can use all kind of other triggers. We have a range of sensors that can be used, i.e.
Or choose something from the long long list of Raspberry projects out there for anything that you might want to adapt (see "Things to do with a Raspberry Pi" at the bottom of the day one worksheet).
To use sensors with the GPIO pins you might need to install some required packages first. A good indicator is if the script just won't run. Usually it's a missing library. Again, Google's your friend! Remember that you can use "sudo apt-get install" plus the name required package to install any software you like.
sudo apt-get update (makes sure you get your software from the latest sources)And then i.e.
sudo apt-get install python-devsudo apt-get install python-rpi.gpio
Two days isn't enough to even get started with all the possible things that you can do, but we hope that this gets you started. Get in touch if you have anything you'd like to add or would like amended.